How to remove the tailgate trim on an MG5 EV
I love my MG5 EV (2022, pre-facelift long-range) but the manual is a bit terrible - I suspect it had to be hastily translated from Chinese by someone who was not given enough time or money to do it properly. When I needed to replace one of the bulbs for the rear number plate, it was both vague and occaisionally outright wrong! Hopefully this description of the process is both more accurate and a little more detailed. If anything is unclear here, do get in touch and I'll try and improve it.
Tool list
- 10mm spanner or socket to disconnect the 12V battery.
- Trim removal tool (or improvise one, see instructions below).
- Phillips #3 screwdriver.
- Large flat-bladed screwdriver.
Method
- Open the tailgate. It's tricky to do this after you've disconnected the battery, so get it open now. Note that you'll need to access the tailgate end at the open height, so if you're a little shorter having something to stand on might be useful.
- Disconnect the 12V battery at the negative terminal. The battery is under a plastic cover in the engine bay. Use a 10mm socket or spanner to undo the nut on the negative terminal clamp (it should be the only one exposed, at the front) until the terminal is loose. The nut should not come all the way off. Remove the terminal from the battery in a decisive movement (some chance of a few sparks) and tuck it out of the way so it doesn't reconnect accidentally.
- Remove the screw covers. These are small plastic pieces located in the bottom the tailgate grab handles, held in by a combination of clips and some double-sided tape. A hook-shaped trim tool (I bent a small sheet-metal spanner that came with some flat-pack furniture) can be used in the recess on the edge of these to pull it out.

- Remove the screws. These are Phillips #3, and seem to be what transfers the force from you pulling on the tailgate handles to the metal part of the tailgate. The trim won't get much less secure at this stage, so you don't need to worry about holding it in place.

- Remove the access panels. At either side of the tailgate, there's a small plastic panel that wraps from the large face onto the edge. Insert a trim tool (or a large flat-bladed screwdriver) and twist to pop this loose. This will provide a point to pull from in the next step.
- Pop the front/top clips. The clips that are above the access panel are the easiest to release and provide the leverage to release the others. There are two directly adjacent to the access holes, and four others in the upper/middle area of the panel that are of the same metal construction. A firm pull away from the tailgate should release these.
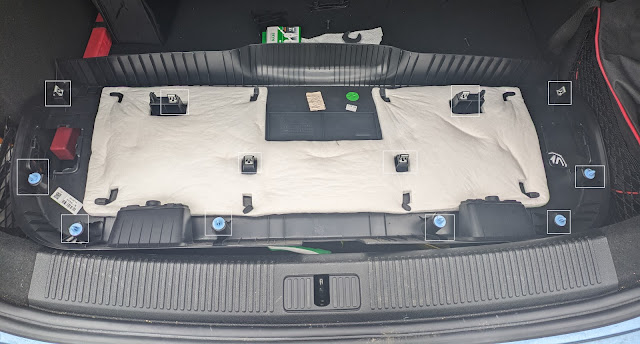
- Release the lower clips. There are 6 plastic clips around the lower edge of the tailgate (the light blue ones in the above photo). Pull firmly (it can take some force!) around the panel to remove them. The panel should then come free, and can be put down somewhere (the boot fits it nicely, but if you're using it as your workbench the back seat is better). Some of clips might stay in the metal panel, but as far as I can tell you're better off removing them and reinstalling them in the plastic panel before you attempt reinstallation. A trim tool (or a thin 10mm spanner) is useful to remove them - slip it under the flat top and lever the clip out.


You should now have the tailgate exposed and you can do whatever job needs done in there. Note that if you're replacing the number plate bulb, the manual is wrong to say "lever the holder out"! The correct method is to squeeze the tab to release the connector, then turn the bulb holder 90° anticlockwise to slip the bulb out of the housing.
Assembly is the reverse process - get the clips in (being very careful to not trap any of the wires in the process), reinstall the access panels, and put the screws back. If you're doing an electrical job, I would actually recommend testing it before reassembly, which will require reattaching the negative battery terminal at that stage.
Hopefully that's helped someone with this job. If any other user-repairable things happen to my MG, I'll try and put up more information here over time.