A shaving brush stand
This project's actually a few years old, from just after I finished my A-levels, but I have enough pictures to explain it well, unlike some other work from around the same time.
The motivation for this is simple - I'm a big fan of shaving soaps and creams that you need to lather up manually, rather than using an aerosol can-type shaving foam. This is partly environmental in origin, because a used pot or metal tube is easier to recycle (and lower energy to make in the first place) than an aerosol can. The other reasons are more pragmatic - a tube of shaving soap lasts ages, and is easy to travel with.
The downside is the need to use a shaving brush, which isn't that big of a hassle, but I wanted mine to last as long as possible, and one of the things that was causing it to look a bit worn-out was the wooden handle being put down on a wet surface, cracking the finish. To prevent this happening any more than it already had, I thought I should make a stand for it that would keep it stored in a way that left it with as much area as possible available for evaporation. This would let it dry nicely after use, extending its lifespan.
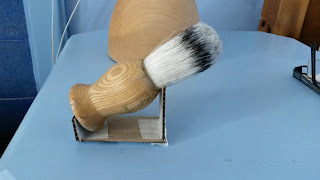
A cardboard mockup was easy to make, and showed the general dimensions I needed. I suspect part of me at the time wondered if I could just cover it in packing tape and call it done (I've made coasters in similar ways before), but given I had time to kill and material available, I carried on to make something a bit better.
As is shown in the picture, the mockup managed what I wanted to achieve, holding the brush up just by the bristles and a single line of contact along the base. It also had rather pleasing proportions (if I say so myself), but that was definitely a bonus not the main goal - my tendency is to aim for 'works' over 'looks nice'.
For a one-off like this exact measurements come second to getting the parts to fit, so I'm fairly sure I transferred the measurements to the acrylic by just tracing around the cardboard, then neatening up with a ruler. The marking up was made a lot easier by the fact that I'd glued a sheet of paper to the acrylic with a glue stick, giving me a surface I could mark with a pencil and not have to worry about cleaning up later. This trick works best if you leave on the plastic backing sheet the acrylic is delivered with, so the whole lot can be peeled off in one go, with no extra cleanup.
There's some rudimentary DFM going on here - all my parts are made up of straight lines, because I only really had a tenon saw to cut them out with, and I couldn't be bothered to try and do anything fancy by sanding or filing curves onto the parts. Cutting a 90° notch in C to hold the brush centred was also the easiest way to go about things. That notch took up the full width of the part because I preferred how it looked that way, and it avoided me having to precisely measure two flat spots on each side.
All the parts were cut out by hand with a saw, then filed and sanded to sort out the surface finish of the edges. I was using a solvent-based cement to stick the parts together, so I needed to make sure the parts were as flat and perpendicular as I could get. Joining PMMA parts with solvent can leave you a really nice-looking part but it has very little in the way of gap-filling abilities, so getting a close fit is key.
After getting the parts all ready for glue-up, I set them up with tape, and put the adhesive in. Looking back now, I should have built some sort of jig to hold the parts in better alignment, because the joints.... aren't great, but it held together well enough, so I'm not too upset. If it were a present for someone else, I would have probably worked a bit harder to make sure the fit and finish were up to scratch.
There then followed some pretty intense work with plastic polish to get all the visible edges nice and shiny, and then I was done.
Have any thoughts about this post? Use the contact page to get in touch.


